

Managing plugins using the cPanel WP Toolkit
The WP Toolkit in cPanel provides a centralized interface to install, activate, update, and remove WordPress plugins. This makes plugin management faster and more secure compared to logging into each WordPress site individually.
Why Manage Plugins with WP Toolkit?
Section titled “Why Manage Plugins with WP Toolkit?”- Install plugins directly from the WordPress repository.
- Enable or disable plugins without logging into WordPress.
- Update plugins to the latest version for security and compatibility.
- Remove unused plugins to reduce clutter and potential vulnerabilities.
- Manage multiple WordPress sites from one dashboard.
Installing a Plugin
Section titled “Installing a Plugin”-
Log in to cPanel.
-
On the Tools page → Domains section, click WP Toolkit.
-
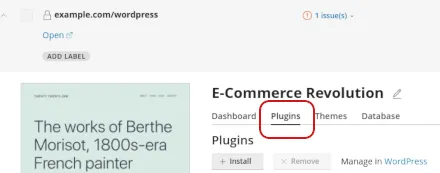
In the site list entry, click the Plugins tab.
-
Click Install.
-
Browse or search for a plugin.
-
Select the plugin and click Install.
- Use the search box or filter sidebar to refine results.
Managing Installed Plugins
Section titled “Managing Installed Plugins”-
In the Plugins tab, you’ll see a list of installed plugins.
-
Available actions:
-
Enable/Disable → Toggle a plugin on or off using the slider in the State column.
-
Update → If updates are available, click Updates, select the plugin, and click Update.
-
Remove → Click the trash can icon to uninstall a plugin.
- You can also remove multiple plugins at once by selecting checkboxes and clicking Remove.
-
Manage in WordPress → Click Manage in WordPress to open the WordPress dashboard for advanced plugin settings.
-