

Staging WordPress with the cPanel WP Toolkit
The WP Toolkit in cPanel makes it easy to create a staging environment for your WordPress site. A staging site is a safe copy of your live website where you can test changes, updates, or new features before publishing them to your main site.
Why Use Staging?
Section titled “Why Use Staging?”- Test updates, plugins, and themes without affecting your live site.
- Experiment with design changes safely.
- Push changes to production only when ready.
- Reduce downtime and avoid breaking your live site.
Creating a Staging Site
Section titled “Creating a Staging Site”-
Log in to cPanel.
-
On the Tools page → Domains section, click WP Toolkit.
-
Locate the WordPress installation you want to stage.
-
Click Clone.
-
Choose where to clone the site:
- New Subdomain (e.g.,
staging.example.com) -
Existing Domain/Subdomain
Section titled “Existing Domain/Subdomain”
- New Subdomain (e.g.,
-
(Optional) Change the database name if needed.
-
Click Start.
-
WP Toolkit will create a staging copy of your site.
Synchronizing Data Between Sites
Section titled “Synchronizing Data Between Sites”Once you’ve made changes on the staging site, you can sync them back to the live site:
-
In WP Toolkit, locate the source site (live or staging).
-
Click Copy Data.
-
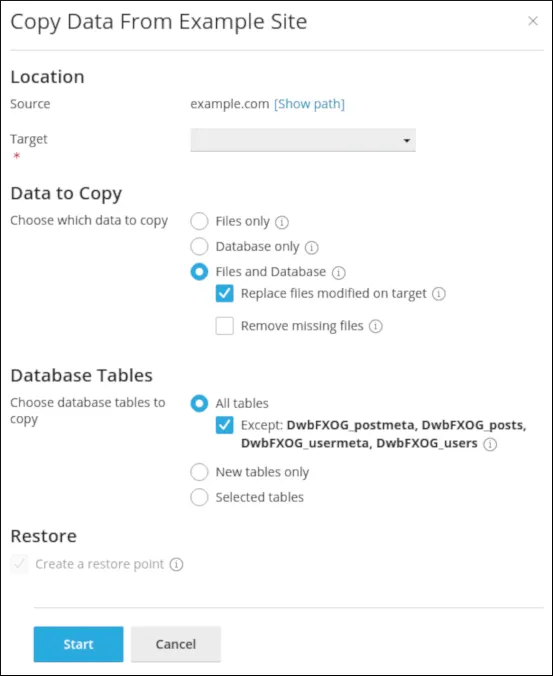
In the Copy Data dialog:
- Location → Select the destination site (staging or live).
- Data to Copy → Choose files, database, or both.
- Database Tables → Select specific tables, new tables, or all tables.
- (Optional) Create a Restore Point → Enables rollback if something goes wrong.
-
Click Start.
-
WP Toolkit copies the selected data to the destination site.
- Always create a restore point before syncing data.
- Staging sites can become out of sync with the live site sync regularly if needed.
- Use staging for testing updates, new plugins, or design changes before applying them live.